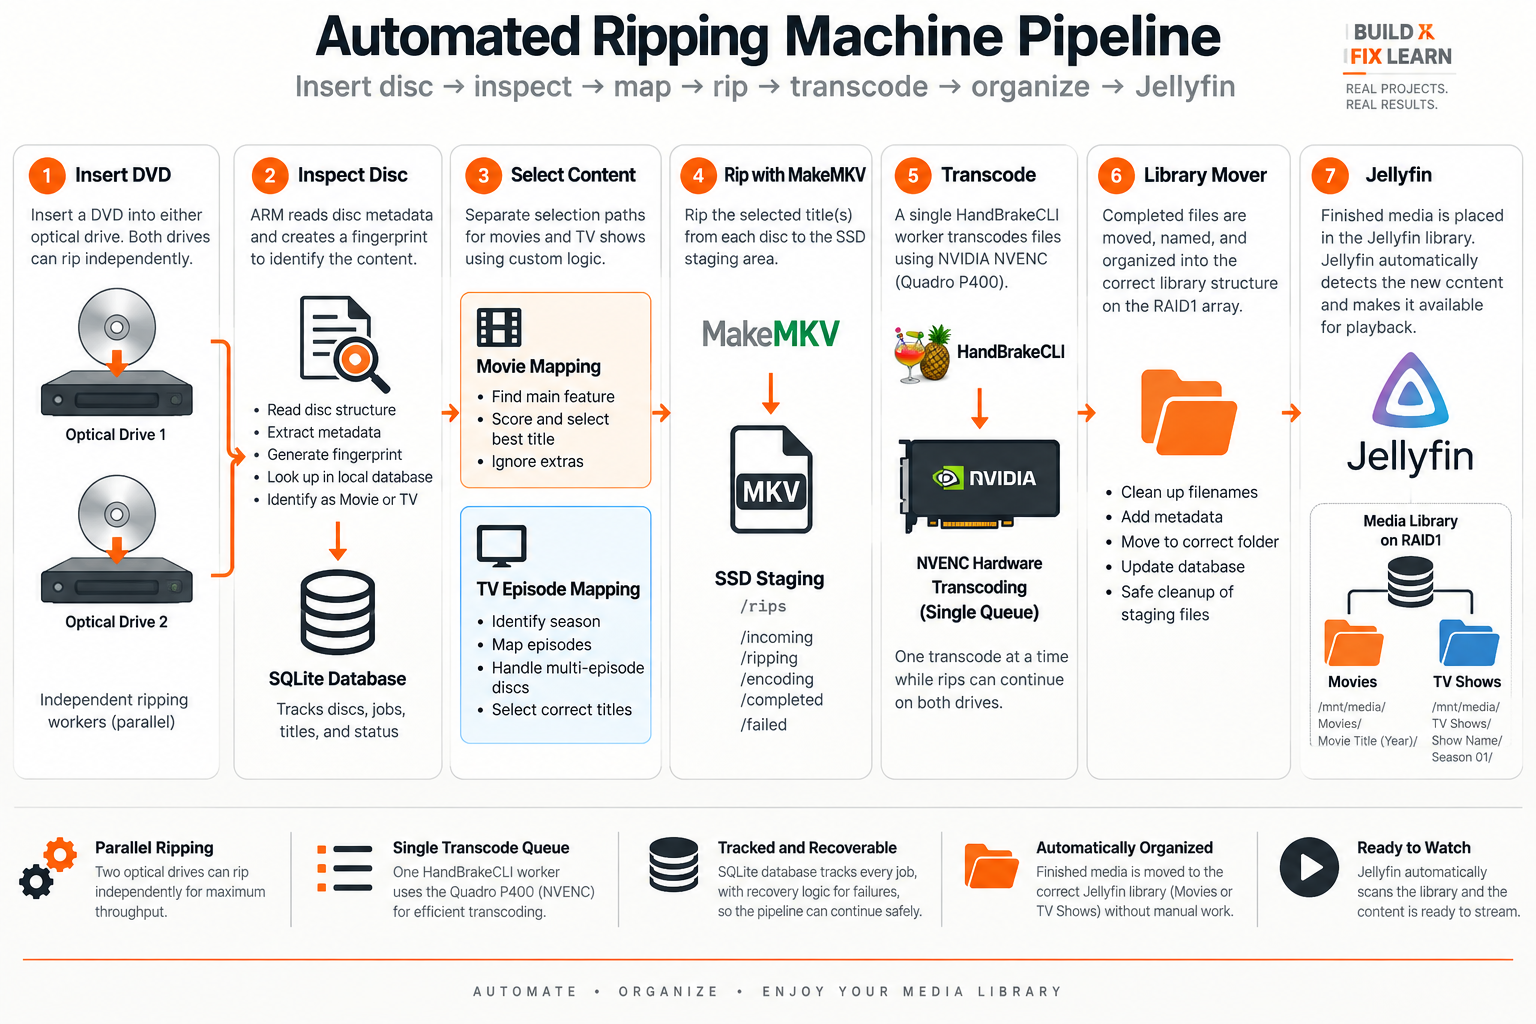
The server runs Ubuntu and uses MakeMKV for ripping, HandBrakeCLI for transcoding, Jellyfin for playback, and a custom SQLite backed pipeline to track jobs. Two optical drives can rip independently, and the library mover automatically organizes completed media and places it in the Jellyfin library.
Want to build your own? Jump to the complete setup guide.
I built this because ripping a large disc collection by hand gets old very quickly. The goal was not just to install MakeMKV and HandBrake. I wanted the machine to keep track of each disc, know what stage it was in, recover from failures, and place finished media in the correct Jellyfin library.
The production system now has separate movie and TV selection paths, persistent disc fingerprints, independent optical-drive workers, a single NVENC transcode queue, automatic library movement, safe cleanup, recovery logic, and an interactive terminal dashboard. TV discs remain the more complicated case because one disc can contain several episodes and sometimes needs metadata correction before the pipeline can safely continue.
The goal
I wanted the normal workflow to be simple. Insert a disc, let the server inspect it, rip the useful titles, transcode them, organize the finished files, and automatically move them into the correct Jellyfin library. Once the pipeline finishes, I do not have to manually copy the movie or episodes into Jellyfin. I also wanted enough logging and state tracking that I could tell what happened when something failed.
Hardware
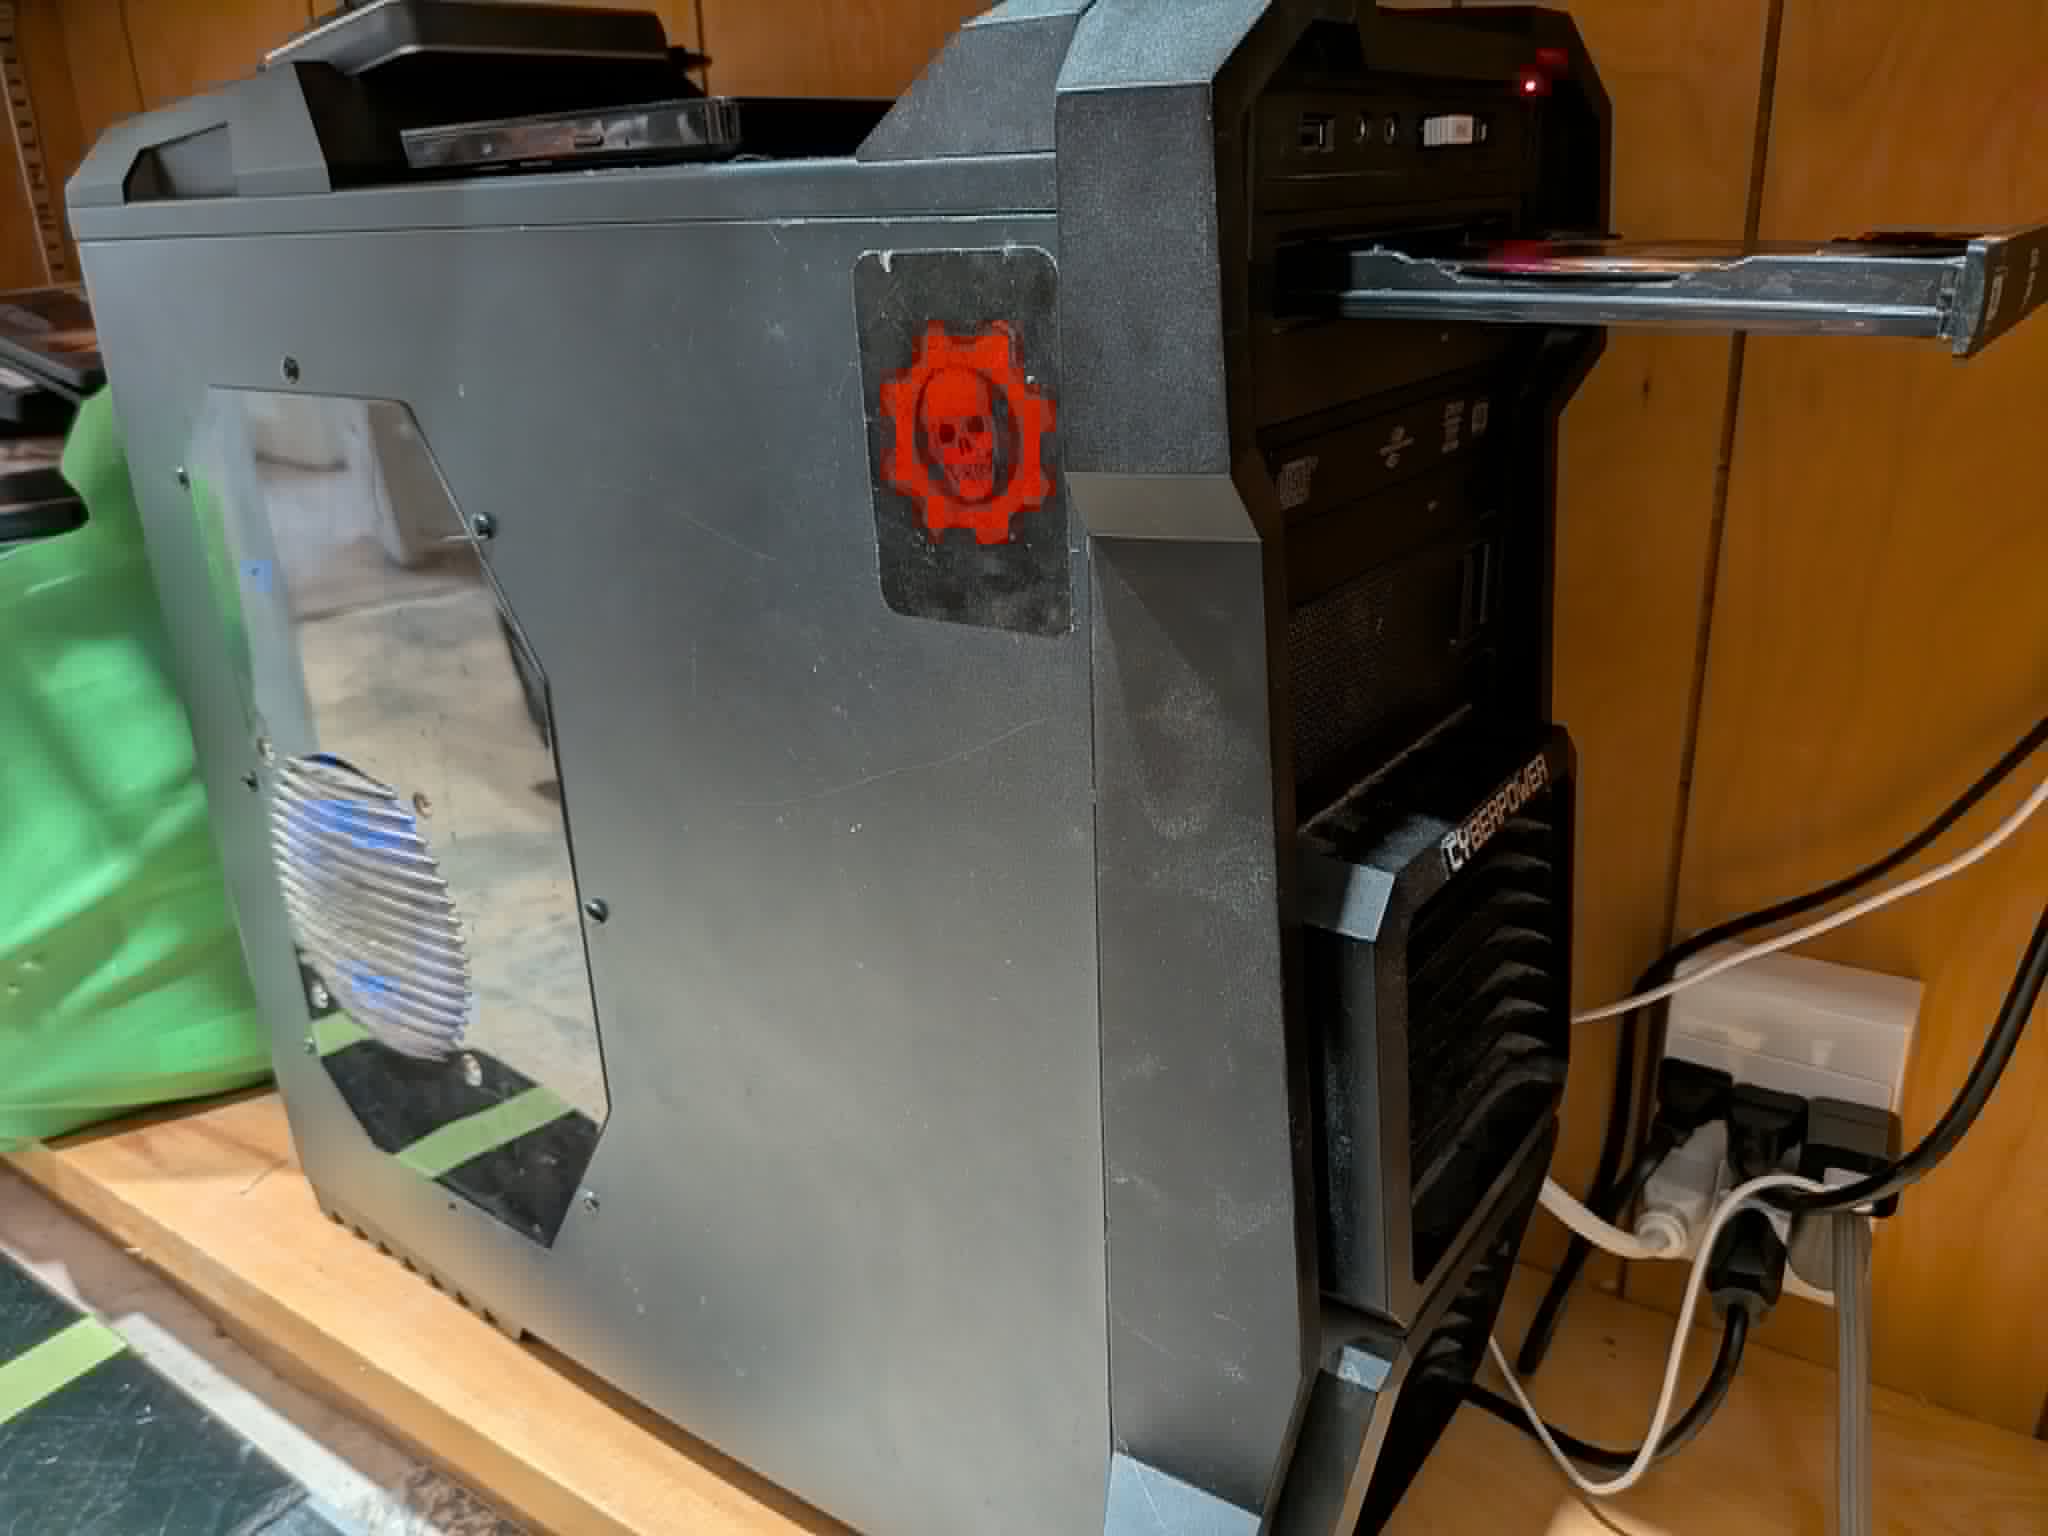
This build started with an old gaming desktop I already had. The important reusable parts were the Intel Core i7-4790K, 16 GB of RAM, the case, motherboard, and two DVD drives. Rather than buy an entire server, I reused that older system and bought the parts needed to turn it into a dedicated Jellyfin and automated ripping machine.
The main hardware I added for this project was a 1 TB SSD, two 2 TB hard drives for the RAID1 media array, an NVIDIA Quadro P400 for NVENC transcoding, and a Wi-Fi card for network access. The CPU, RAM, desktop chassis, motherboard, and DVD drives were already on hand.
| Hardware | Source | Job in the server | Hardware link |
|---|---|---|---|
| Intel Core i7-4790K | Already owned | CPU | Existing hardware |
| 16 GB RAM | Already owned | System memory | Existing hardware |
| 1 TB SSD | Purchased | Ubuntu, ARM, and /rips workspace | View on eBay → |
| 2 × 2 TB hard drives | Purchased | RAID1 Jellyfin media storage | View on eBay → |
| NVIDIA Quadro P400 | Purchased | Dedicated NVENC transcoding | View on eBay → |
| Wi-Fi card | Added | Network connection for headless operation | View on eBay → |
| Two DVD drives | Reused | Independent disc ripping | Existing hardware |
Affiliate disclosure: Some product links on Build Fix Learn are affiliate links, including links through the eBay Partner Network. If you purchase through one of these links, I may earn a commission at no additional cost to you.
Built to run headless
The server is designed to run headless during normal use, so it does not need a dedicated monitor, keyboard, or mouse taking up space. I manage it remotely and can place the machine wherever it fits best. I added a Wi-Fi card so the server can stay connected even where running Ethernet is inconvenient. The Intel integrated graphics remains available if I ever need to connect a local display for maintenance.
The Quadro P400 was purchased specifically to handle NVENC media transcoding, keeping that work off the CPU while the rest of the ARM pipeline continues running.
Software
The main pieces are Ubuntu Server, MakeMKV, HandBrakeCLI, Jellyfin, and a custom automation layer. I chose to run the ripping system directly on the host instead of putting it in Docker because I wanted straightforward access to the optical drives, GPU, storage, and system services.
Storage layout
I separated temporary ripping work from the permanent Jellyfin library. The SSD absorbs the constant writes from ripping and transcoding. After transcoding, the library mover organizes the finished media and moves it to the correct Movies or TV Shows location on the RAID1 array so Jellyfin can pick it up automatically.
/rips/
  incoming/
  ripping/
  encoding/
  completed/
  failed/
  logs/

/mnt/jellyfin/
  Movies/
  TV Shows/
This layout also makes cleanup easier. If a job fails, I can inspect the temporary files without touching the permanent library.
How the pipeline works
The ARM is a state tracked pipeline rather than one long script. SQLite keeps the job history in /opt/arm/state/arm.db. The main tables are jobs, job_files, job_titles, events, and system_state.
DISC INSERTED
      ↓
DISC INSPECTOR
      ↓
INSPECTED
      ↓
TITLE SELECTOR
      ↓
TITLE_SELECTED
      ↓
MAKE MKV RIP
      ↓
RIPPED
      ↓
HANDBRAKE TRANSCODE
      ↓
TRANSCODING
      ↓
LIBRARY MOVER
      ↓
LIBRARY_MOVED
      ↓
SAFE CLEANUP
Each optical drive can have one independent ripper worker. That means /dev/sr0 and /dev/sr1 can rip at the same time. The orchestrator does not wait for one drive to finish before advancing the other. Transcoding is deliberately different. Exactly one HandBrake worker is allowed at a time, so completed rips form a queue while the optical drives remain free to keep working.
The known good scheduler can therefore have one job transcoding while another job is still ripping. On restart, orphaned RIPPING jobs are returned to TITLE_SELECTED, and orphaned TRANSCODING jobs return to RIPPED so they can be retried.
Movies normally select one primary feature. TV discs can select several episode titles. The selected titles are stored in job_titles. After transcoding, the library mover places movies in the Movies library and mapped episodes in the correct TV show and season directory. The job is only considered moved after the destination is verified, and existing destinations are protected instead of being overwritten.
How movie mapping works
Movies and TV discs use separate title-selection paths. For a movie, ARM is trying to find one main feature rather than several episode-sized titles. During disc inspection, MakeMKV reports each title and ARM stores the title metadata in job_titles. The movie selector then scores every candidate using runtime, chapter count, and file size.
MOVIE DISC INSERTED
      ↓
INSPECT MAKEMKV TITLES
      ↓
SCORE EVERY TITLE
runtime + chapters + size
      ↓
SELECT HIGHEST-SCORING FEATURE
      ↓
MARK ONE TITLE SELECTED
      ↓
RIP WITH MAKEMKV
      ↓
TRANSCODE WITH HANDBRAKE NVENC
      ↓
LIBRARY MOVER
      ↓
Movies/<MOVIE>/<MOVIE>.mp4
      ↓
JELLYFIN LIBRARY
The scoring rules deliberately favor feature-length titles. Titles at least 90 minutes receive the strongest duration bonus, titles at least 60 minutes receive a smaller bonus, and titles at least 30 minutes receive a smaller one again. Runtime also contributes to the score directly, while chapter count and file size provide additional weight. After scoring, ARM sorts the candidates by score, then runtime and size, and selects exactly one title.
That selected title becomes the movie job that moves through ripping and transcoding. When the MP4 is complete, the library mover creates the movie destination under /mnt/jellyfin/Movies, verifies the final destination, and only then records the job as LIBRARY_MOVED. Because Jellyfin already watches that directory, the finished movie appears in the library without a manual copy step.
A movie normally needs one best feature selected from a disc. A TV disc may need several titles kept, ordered, and assigned season and episode numbers. Treating those as separate paths keeps movie selection simple while allowing the TV logic to be much more conservative.
How TV episode mapping works
TV discs need a different workflow because a single disc can contain several full length titles. ARM first classifies the disc using its label and configured TV overrides. Season-style labels such as SEASON 1, S01, and S1 can provide a season automatically. The production classifier also recognizes some spelled-out season and disc markers, while ambiguous publisher labels such as a volume number can be held for metadata confirmation instead of guessing that the volume is the season.
During inspection, MakeMKV reports the titles on the disc. ARM records those titles in job_titles, including their title order and MakeMKV title ID. The title selector can then keep several episode length titles instead of choosing a single feature like it would for a movie.
TV DISC INSERTED
      ↓
READ SEASON FROM DISC LABEL
      ↓
INSPECT MAKEMKV TITLES
      ↓
KEEP EPISODE LENGTH TITLES
      ↓
ORDER SELECTED TITLES
      ↓
ASSIGN SEASON + EPISODE NUMBERS
      ↓
S01E01, S01E02, S01E03 ...
      ↓
RIP EACH SELECTED TITLE
      ↓
TRANSCODE
      ↓
TV Shows/<SHOW>/Season 01/
The important part is that the episode mapping becomes part of the job record. ARM does not wait until the end and try to guess which file is which from a filename. The season and episode information follows each selected title through ripping, transcoding, and library placement.
For example, a disc labeled GAME_OF_THRONES_S1_DISC1 is recognized as Season 1. If the selected titles represent several episodes, ARM can associate them with Season 1 episode numbers and eventually place the finished files into the Jellyfin TV library using names such as S01E01 and S01E02.
A TV disc may be interrupted after ripping one episode but before another finishes. Keeping the title, season, episode, and job state in the database means the pipeline can recover without losing track of which episode each file belongs to.
The terminal interface
I wanted to be able to walk up to the server and understand the whole machine without opening several logs or querying SQLite by hand. I built arm-status as a terminal dashboard that refreshes every two seconds.
It shows the ARM service state, current activity, each optical drive, the pipeline, the last five jobs, TV and movie library information, active MakeMKV and HandBrake processes, rip output growth, recent ARM events, system load, RAM use, and SSD usage. It also provides keyboard controls to eject a drive or quit the dashboard.
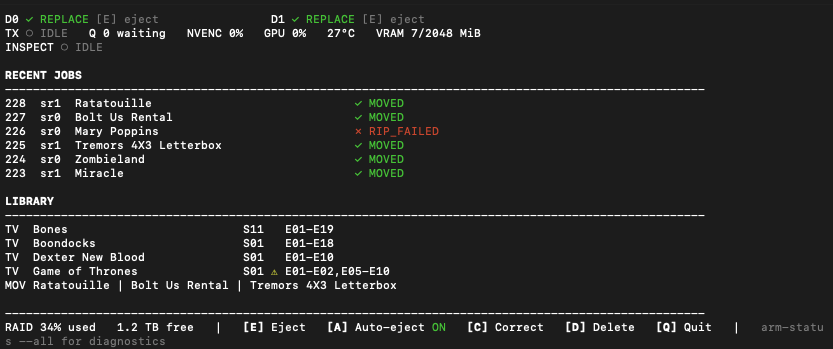
arm-status interface. Network and account information were cropped from the screenshot before publication.Problems I ran into
TV discs were the first major problem. A movie usually has one obvious main title. A TV disc can contain four or more episodes, menus, extras, and duplicate looking titles. The pipeline has to preserve each useful title and assign the correct season and episode number.
Disc identity created another problem. Some DVDs have useful labels, but a movie can also show up with a generic name such as DVD Video. A label like that cannot safely identify a disc because a completely different movie may report the same thing. We had to add a repeatable disc fingerprint so ARM could recognize the disc from its structure instead of trusting the displayed label alone. That fingerprint also gives duplicate detection something stable to compare when the same disc is inspected again.
I also found that one optical drive was unreliable while the other drive handled the same disc correctly. That is exactly why persistent job tracking matters. A failed rip should be recorded as a failed job, not leave the entire system in an unknown state.
Do not assume every failure is a software problem. When two drives behave differently with the same disc, test the hardware before rewriting the pipeline.
Another issue was state handling. A job can successfully rip files but still fail later during naming, transcoding, or library placement. I ended up treating those as separate stages instead of using one generic success or failure flag.
Where the project stands
The production DVD workflow is working for both movies and TV. Movies use one-feature scoring and TV uses episode candidate selection plus season and episode mapping. The system also has fingerprint-based duplicate handling for generic disc labels, correction tools for metadata problems, automatic Jellyfin refresh support, auto-eject, restart recovery, safe cleanup, and a terminal dashboard. I still treat the rules as a living system because different DVD publishers can organize titles in very different ways.
After the DVD workflow is solid, Blu ray support is the next logical expansion. I would rather finish the job tracking and TV naming correctly before adding another disc format.
What I learned
The biggest improvement was treating this as a small system instead of a pile of shell scripts. Once jobs, files, titles, and events had persistent records, troubleshooting became much easier. I could see what the server thought had happened instead of guessing from whatever files happened to be left in a folder.
I would also keep the temporary SSD and permanent media storage separate if I built it again. Ripping and transcoding create a lot of temporary data, and there is no reason for that activity to happen directly on the media array.
This project is not finished, which is part of why I am documenting it. I will update this guide as the TV workflow, naming logic, and Blu ray support are completed.
Build your own ARM
The complete guide covers the server from a fresh Ubuntu installation through RAID storage, Jellyfin, MakeMKV, HandBrake, the ARM database, automation pipeline, movie mapping, TV episode mapping, disc fingerprinting, automatic library movement, recovery, cleanup, and testing. The sanitized production scripts used by this machine are included.
About the downloads: The Markdown guide is plain text with simple formatting and opens in ordinary text editors. The source package contains the sanitized production ARM files without personal or machine-specific information.